Showing posts with label blue. Show all posts

Monday, December 7, 2015

NOTD: Hanukkah nails! (2/?)

Hello again and happy ongoing holiday! Today I made dreidel inspired nails, I painted each of the letters of the dreidel in acrylic paint over a brown/beige watermarble that is meant to evoke the look of a wood grain.


For reference, here is a dreidel:


The letters on the dreidel are as follows:


  • נ (nun)- this stands for the word נס (nes), which means "miracle"
  • ג (gimmel)- this stands for the word גדול (gadol), which means "great" or "big"
  • ה (heh/hey)- this stands for the word היה (hayah), which means "occured" or "happened"
  • ש\פ (shin or pey) which either stand for שם (sham), which means "there" or פה (po), which means "here". The usage of ש vs פ depends on whether you are celebrating inside or outside Israel,


Together, they stand for the prase "A great miracle occured here/there"

Sunday, December 6, 2015

NOTD: Hanukkah nails! (1/?)

Happy Hanukkah everyone! I don't have anything super profound to say about this nail art, but it was surprisingly fun to do, and very easy! I was thinking about starting with only one lit candle and then adding a new one every day, but that would mean leaving this on for eight days, and if you know me at all, making me wear the same nail polish for even three days is cruel and unusual. Even if somehow a Hanukkah miracle occurred and it didn't have any chips or tip wear in that spam of time. I suppose it would be a seasonally appropriate miracle, but I'm not patient enough to test it out :D I have a few Hanukkah nail designs planned out, but I'm not committing to a full eight days of new nail art, so let's see how many I can manage!


Friday, December 4, 2015

NOTD: Coooooookkkkkkiiiiieeeeeee!!!

I think this might be the fastest turnaround I've ever done on a post, and that includes 31DC (I usually try to run a day or three early so that I have time to prepare posts). I painted my nails, photographed, and edited everything within a span of three hours for this post! I had originally done this design yesterday, but the photos were pretty terrible because of the overcast weather, and this morning I redid them because I had pretty bad tip wear.

I did these nails as part of a challenge posted in a Facebook nail art group I'm in, where the theme was "Matte + Glossy". I dunno what brought cookies to mind, but I decided to run with it! I made the base of the cookie matte, and then I added drops of glossy top coat over the chocolate chips, which also made them a little bit bumpy, adding even more realism! And then of course, I had to make a simple Cookie Monster accent :D


Polishes used:
Bourjois- In The Navy (blue base)
perfect Chic- Frost (cookie base)
Careline- Hot Chocolate (brown outline)
Superficially Colorful- Mud Slide (chocolate chips)
Ga-de- Whitest White
LeChat- Black Magic
Golden Rose matte top coat

Tuesday, December 1, 2015

NOTD: Flannel

I'm finally jumping on the flannel bandwagon! Since autumn rolled around we've been seeing lots of flannel and plaid inspired nails, so I thought I'd give them a try! I stamped over these with the musical plate from Vivid Lacquer, and then I added a little more detail with acrylic paint and a striping brush. To give it an extra soft look I topped it off with a matte top coat.


Polishes used:
Loka- unnamed green
Perfect Chic- Must Have (red)
Borjois- In The Navy (blue)
Golden Rose matte top coat

Tuesday, October 20, 2015

NOTD: Gradient and squiggles

Well, I guess I'm not finishing 31DC this year. The timing was pretty terrible for me this time around, the end fell right smack on the build up to Icon this year, so it was amazing that I even got as far as I did!

Well, now it's time to go back to a semi-regular posting schedule. Here are some random squiggles on nails, inspired by this manicure from Heynicenails on tumblr! (and instagram, but I follow them on tumblr). I decided to do the doodly white shapes over a gradient instead of colorful skittles, but it's still similar enough to credit back to them.


Polishes used:
Ga-de Blue Angel (blue)
Ga-de Pool Party (mint green)
Ga-de Kiwi Delight (green)
White acrylic paint

Sunday, September 27, 2015

#31DC2015 Day 27- Inspired by Artwork

Late post late post late post whooops!

The artwork I chose for today's challenge is that of adult coloring books, which have been all the rage lately. And having finally purchased one for myself, I definitely see why! They're gorgeous to look at when they're not filled in, and they're so gratifying to look at when you finish a piece, because you feel like you contributed to the beauty of the artwork.

For this nail art I stamped with plain black over white with BP-L002 from the Born Pretty Store, a suitably "doodle-y" looking plate, and then I filled in random bits with acrylic paint. I based it on a specific drawing from the coloring book I'm currently working on, which is sadly not Secret Garden (maybe once I fill this one I'll buy Secret Garden?). But I'm actually really happy with the art in this book, so I'm good :D


Saturday, September 26, 2015

#31DC2015 Day 26- Inspired by a Pattern

Alternate post title: Leah discovers that it is Very Difficult to do hand poses with a mug

So I've actually kind of known what I wanted to do for this day since last year. About a day after the Pattern challenge last year, I walked into my work kitchen and facepalmed because we have these adorable mugs with hearts on them that would be PERFECT for this kind of thing.

I actually sent pictures of this mani sans mug to the R&D group chat at my work, challenging them to try and figure out where they recognize the pattern from. I don't think any of these guys had ever gotten excited over nail art before, but they have now! (followed by a lot of ppl casually commenting "why don't you do this for a living???")

And in case you're wondering, yes, I did have to steal this mug and bring it home with me in order to make sure I matched the colors well. No one noticed. I did bring it back I promise!

Here is the mug by itself (sitting, rather incriminatingly, in front of one of my nail polish shelves)


And here are the three least awkward attempts at me posting with said mug:


Polishes used:
Color club- French tip (white base)
Golden Rose Color Expert- 43 (light blue)
Ga-de- Blue Blood (navy blue)
Ga-de Candy Apple (red)
Laka- 85 (grey)
Chic- Crazy in Love (green)


Thursday, September 24, 2015

#31DC2015 Day 24- Inspired by a Book

Comic books count, right? Comic books totally count. Anyway, I've wanted to do Kamala Khan themed nails since basically always. So here she is! (have you noticed that my descriptions have been getting shorter? Is this what burn out feels like?)


Polishes used:
Chic- Sweetheart (well... close enough) (beige)
Chic- Must Have (red)
Color Club- French tip (white)
Ga-de- Mellow Yellow (yellow)
Borjois- In the Navy (blue)


Wednesday, September 23, 2015

#31DC2015 Day 23- Inspired by a Movie

This is a bit of a cheat, since I did these nails based off the TV show, not the horrible abomination they call a movie. I'm still in denial about that thing existing (THERE IS NO WAR IN BA SING SE)

Avatar: The Last Airbender: The cartoon, not the in-name-only """""""adaptation"""""""!

This post is going up suuuuper late, it was Yom Kippur today and I didn't feel comfortable posting even via a queue


Polishes used:
Pupa 745 (pinky)
Golden Rose Matte 16 (ring finger)
Lechat Majestic Green (middle finger)
Il Makiage Skinny Dipping (index finger)
Details are acrylic paint


Thursday, September 17, 2015

#31DC2015 Day 18- Half Moons

I always forget that this day exists for some reason. Honestly, I'm not a huge fan, I'd much rather do a french tip than a half moon. But alas! I'm also not that great at them, weirdly enough. I don't have vinyls, so I'm stuck with freehand for these fellers. I'm okay with how they came out, mostly because the gluequins I stuck on the border between the two colors hides how sloppy the half moons actually are :D :D :D

Also! This is the first mani I have ever done using Zoya!!!!!! I picked up a few Zoyas in a destash recently, my first ever. They're virtually impossible to get here, so I'd been lemming that brand for years, and now I have some!


Polishes used:
Zoya- Dream (blue)
Impala- 099 (gold)


    An InLinkz Link-up
   

Wednesday, September 16, 2015

#31DC2015 Day 17- Glitter

Glitter is such a deceptively simple theme, isn't it? Since it's pretty broad, I decided to challenge myself to try something out of my comfort zone. In this case, that's bar glitter.

There's a story behind this polish: A while ago, my best went to America, land of the nail polish brands they don't have around here. Since she's also pretty into nail polish (although nowhere near obsessed like I am), I handed her $20 and said "surprise me". She came back with two really gorgeous glitter toppers, and this. I genuinely didn't know what to do with it, so it's been sitting on my shelf pretty much untried for over a year.

I have to say, having now tried it, I like this polish a lot more than I was expecting to! The color scheme is surprisingly flattering for my skin tone, and the bars don't bother me nearly as much as I was expecting. It's fairly opaque in three coats, but I sponged it on to save on "bulk", and then topped it with a couple of peacock feather decals from the Born Pretty Store. It's a little textured after one topcoat, but two layers of topcoat makes it almost completely smooth.

Now I'm thinking I might revisit some other short-matte-bar glitter polishes that I'd put on my destash shelf. I wonder if I'd like those too?


Polishes used:
Ga-de- Beige Caress (beige base)
Sally Hansen- All Yarned Up (glitter topper)


Tuesday, September 15, 2015

#31DC2015 Day 15- Delicate Print

For this topic I decided to recreate the nails I did for my brother's wedding about a month and a half ago. I was a little busy at the time, so I only snapped one or two photos of it, and nothing really good enough to put on my blog. So here it is again, properly photographed!


Polishes Used:
Color Club- French Tip

The rest is magic marker! I can't imagine that I'm the first person to figure this out, but I didn't follow any kind of tutorial or inspo to come up with this, I did think of it on my own. Here's how to do what I did:

  1. Paint your nail with a light colored base (I used white)
  2. Add a matte topcoat (the marker needs something to grip)
  3. Scribble all over your nails with magic marker- try to cover as much of the surface as possible
  4. Dip a q-tip in alcohol and gently dab it onto the nail. The marker will immediately begin to dissolve and marbelize. Be careful not to use too much alcohol, because then the marker will just come off completely
  5. Repeat steps 3 and 4 as many times as necessary to achieve the desired effect
  6. Once the marker is dry, add a glossy top coat
I used a range of teal to purple magic markers (the ones pictured plus one dark indigo and one dark green) to achieve this exact look. The gold squares are from the DecoPopShop on Etsy


Sunday, September 13, 2015

#31DC2015 Day 13- Animal Print

Animal print has been and always will be a challenge for me, because I hate everything associated with leopard print or zebra/tiger stripes. So I can't go with anything related to that. Still, I think in the last two years I came up with pretty creative ways to get around that, and I'm pretty satisfied with how I did it this time too- fish! This is a jelly sandwich stamping mani, so I started with a shimmery green base, stamped over it with an ocean-y sort of print, then went over it with a dark blue jelly and put fish on top. I topped the whole thing off with some more jelly and then some iridescent flakies.


Polishes used:
Orly- Meet Me Under The Mistletoe (green shimmer base)
Color Club- French tip (white stamping)
Glitter Bunny- Jelliefish (blue jelly sandwich)
Indigo Bananas- Bonanza! (flakie topper)


Friday, September 11, 2015

#31DC2015 Day 11- Polka Dots

This is the fourth day in a row that features holo prominently in my nail art, I think I'm falling into a pattern here. Ah well, can't go wrong with a good holo design, and teeny tiny dots that took way too long to make! Right?

The middle two fingers and the outer two fingers have slightly different base shades, but I realized after I finished the mani that you can barely tell the difference. Whoops!


Polishes used:
Essence- You Belong to Me (middle and ring finger base)
Golden Rose Color Expert- 43 (index and pinky fingers)
ILNP- Summer Stargazing (blue holo dots)
ILNP- Fall Semester (teal holo dots)
ILNP- A Fresh Evergreen (green holo dots)
ILNP- My Private Rainbow (holo topcoat)


Saturday, September 5, 2015

#31DC2015 Day 5- Blue

After how complicated my last mani was, I decided to go for something fairly clean and simple for blue. The dots on the accent nail give off kind of a clownish vibe, but I actually am ok with that.


Polishes used:
Ga-de- Azure blue (light blue)
Orly- Sweet Peacock (blue microglitter)


Thursday, August 13, 2015

Gradient/Geometric nails and a Youtube video!

It's been a while! I really should stop making excuses, I should just own up to the fact that I'm an infrequent blogger and be done with it. I have no plans of abandoning this blog, but I also recognize that my life is pretty full right now, so while I might sometimes post multiple times per week, I might also sometimes not even post once a week. Maybe in the future I'll have a little more control over my free time, but for now I'm just going to update when I can. I'll try not to go more than two weeks with no posts though!

Also, I'm somewhat more active on Instagram, since it's a more spontaneous sort of medium, so check me out there! (@fedoraharp)

Recently I got a few new plates from MoYou London, and as with all MoYou plates, I absolutely LOVE them. For this manicure I used the Holy Shapes collection plate #1. And since I love the pairing of vibrant gradients with sharp clean geometric lines, I decided to do that kind of mani.


Colors used:
Golden Rose Color Riche 16 (blue)
China Glaze Custom Kicks (teal)
Color Club Disco Dress (purple)
Ga-de Burgundy Velvet (fuchsia)
Konad black stamping polish

You know, I have a HUGE nail polish collection, but I constantly gravitate towards these polishes in gradients. I should really branch out more XD Not that I don't love this color combo, or these polishes (clearly I have the opposite problem), but I feel like I'm probably not using my collection as effectively as I should.

I almost forgot! I recently published a cute (albeit somewhat pointless) little Youtube video, just a few of my recent pouring videos stuck together one after another set to calming music. Still, I like them better with the music. For some reason I find these things really hypnotic, don't you?


Saturday, June 20, 2015

Sinful Colors + GoldNails summer collection

Recently Sinful Colors released a new bright, summery collection in collaboration with Goldi from GoldNails, and they sent me a few nail polishes to review and create some designs with. I am very excited to show them to you here!

לאחרונה, סינפול קולורס הוציאו קולקצית לקים בהירה וקיצית בשיתוף פעולה אם גולדי מ-GoldNails, ושלחו לי חלק מהלקים לסקור ולהכין איתם נייל ארט קייצי. אני מתה להראו לכן מה הכנתי!

In this post I have swatched each of the three colors I was sent, plus three different nail designs, each on a different base.

בפוסט הזה עשיתי סוואצ'ים לכל שלושת הלקים שנשלחו אלי, פלוס שלושה נייל ארטים- כל אחד על בסיס אחר.

Cinderella:


Cinderella is a soft blue cream polish with a hidden pink shimmer. What a perfect name for this polish! This color is perfectly reminiscent of Cinderella's beautiful blue ball gown from the classic Disney movie. The shimmer doesn't change the overall color, but it adds a softness and a magical tone to the look. I used four coats for this swatch.

Cinderella זה לק תכלת אם גימור קרמי עם שימר ורוד עדין. איזה שם מושלם לצבע הזה, נכון? זה בדיוק מזכיר את השמלה המהממת שסינדרלה לבשה בסרט דיסני הקלאסי. השימר לא משנה את הצבע עצמו, אלא מוסיפ לו גימור רך ועדין וקסמי. בתמונות האלה אני מרחתי 4 שכבות.

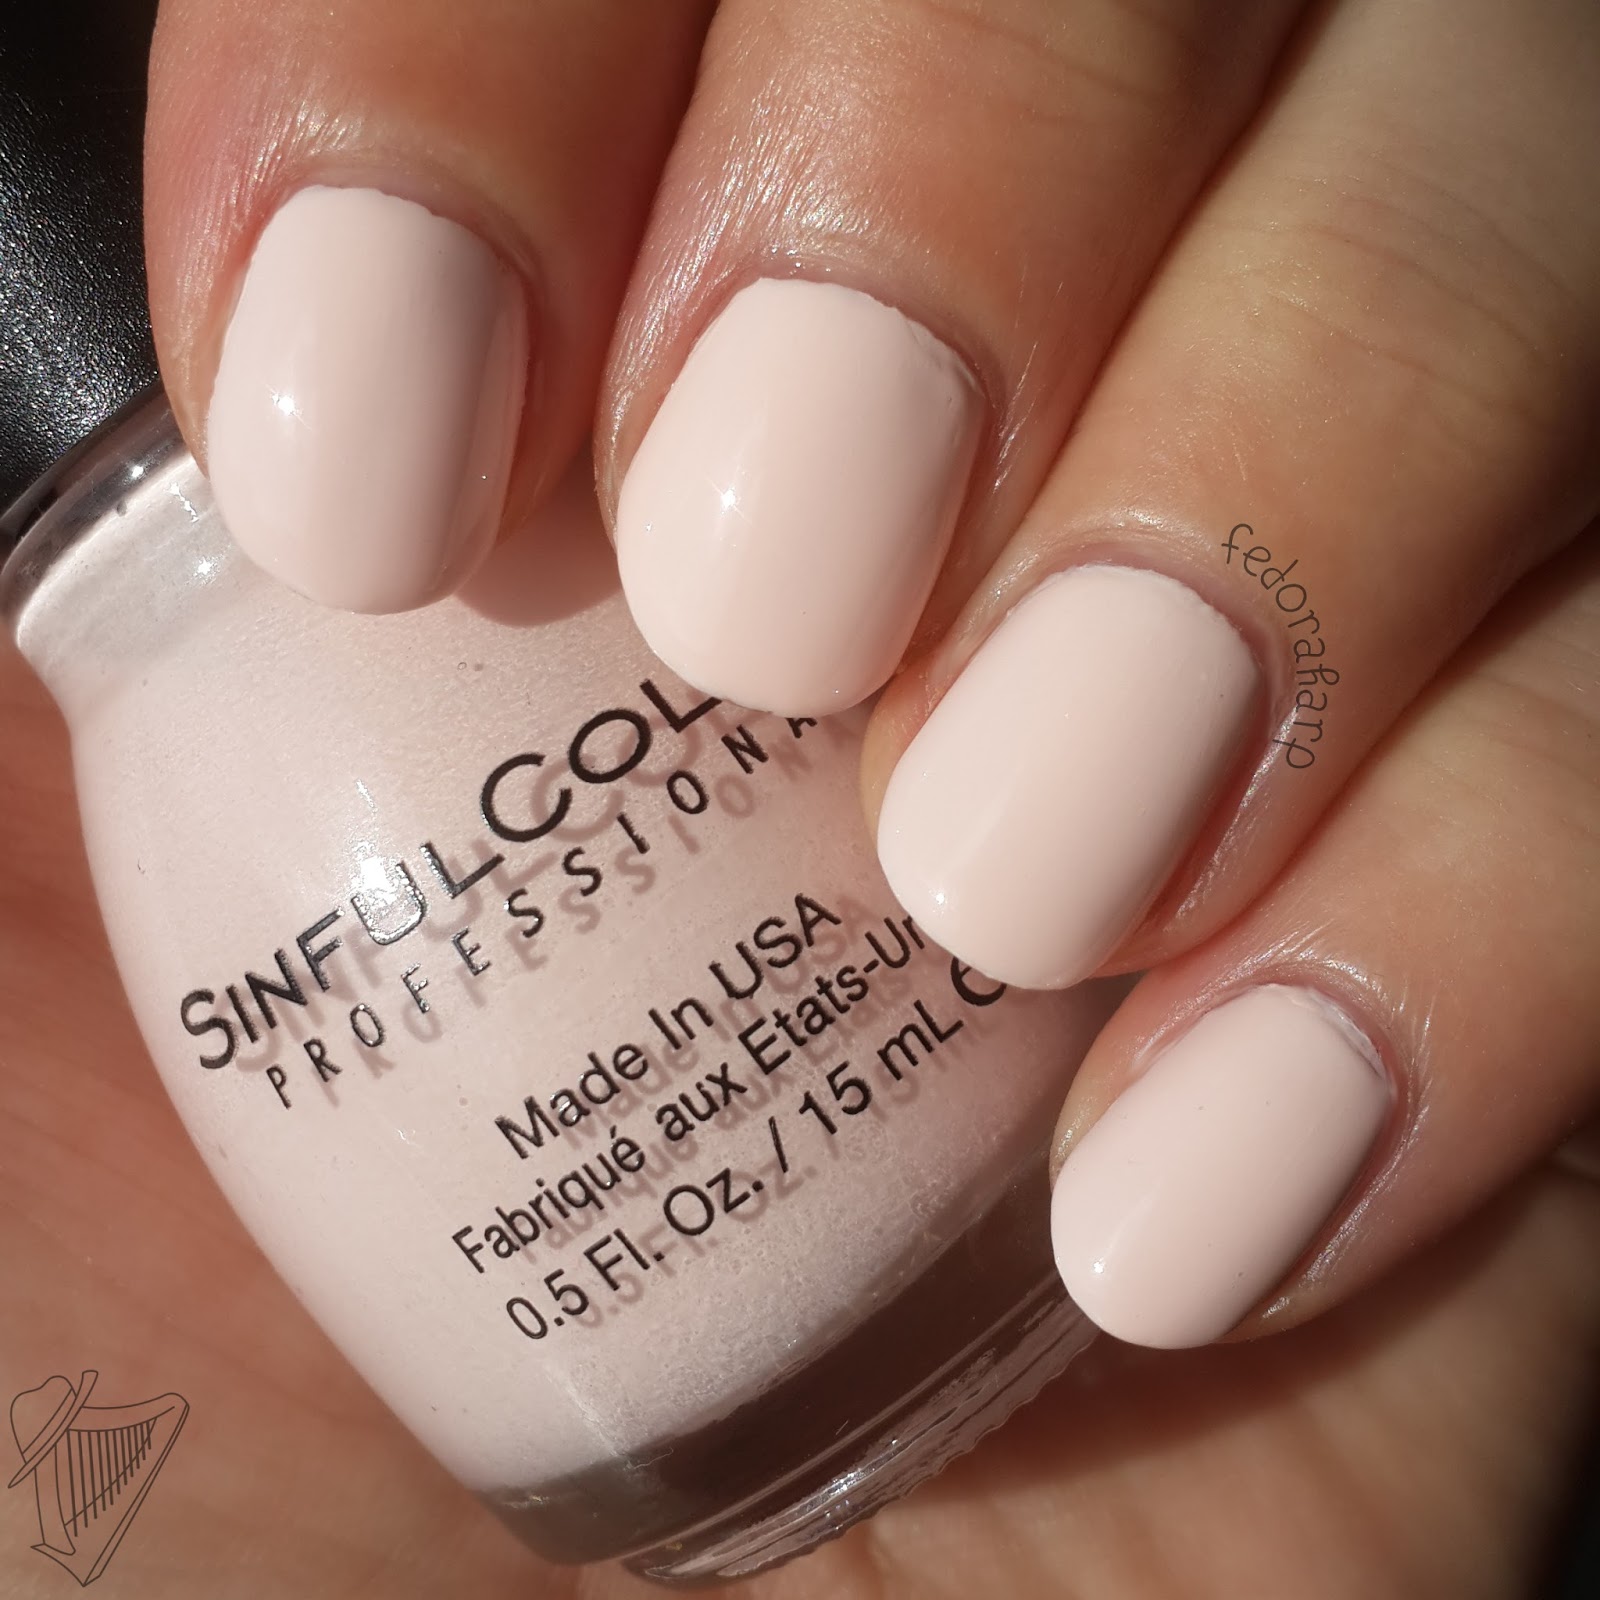
Easy Going:


Easy Going is another very soft shade, this time a pale nude/pink color that is almost white. I can see why it's called Easy Going, this is a very laid back and easy to wear polish. It's a great base for nail art, too! This polish applied very streaky at first, but after three coats and top coat it is smooth and even.

Easy Going זה גם צבע מאוד עדין, הפעם ניוד/ורוד שכמעט לבן. גם ללק הזה יש שם מאוד מתאים לצבע שלו- זה צבע שממש קל ללבוש אותו, הוא נטרלי אך לא משעמם בכלל. בשכבה הראשונה הלק הזה יצא מאוד לא אחיד, אבל שמתי שלוש שכבות והוא קיבל מראה אחיד ומבריק.

Boogie Nights:


Boogie Nights is a bright, cheerful cream/jelly hybrid which is almost but not quite red. I can't quite call this orange either, I don't really know how to describe it! This one is definitely my favorite nail polish of all three, it's so energetic! I used three coats for this swatch.

Boogie Nights הוא צבע זוהר ושמח, עם גימור קרמי/ג'לי ממש מיוחד. הוא יושב על קו התפר בין אדום וכתום, כך שאני לא ממש יודעת איזה מהם להגדיר אותו! הצבע הזה הוא בהחלט האהוב עלי ביותר מבין שלושתם, הוא ממש אנרגטי ומרענן! בתמונות האלה שמתי שלוש שכבות.

Now for the nail art!
ועכשיו לנייל ארט!


I created this look with a dotting tool, but it can also be recreated with a toothpick or a bobby pin.
את הלוק הזה הכנית עם כלי מנקד, אבל אפשר להכין אותו אפקט אם קיסם שיניים או סיכת סבתא.


I created this look using striping tape as guidelines, but regular tape will work as guidelines too- just be sure the nail polish underneath is 100% dry before applying it.
את הלוק הזה הכנתי עם סלוטייפ שמיוחד ללקים, אבל אפשר גם עם סלוטייפ רגיל. רק ממש חשוב לוודא שהלק 100% יבש לפני ששמים עליו סלוטייפ!


I created this look using the water spotting technique. There are many tutorials for this technique and I am not sure where it originated, but I will briefly describe it: Place a few drops nail polish on the surface of a cup of water and let them spread out for a couple of seconds. Then spray the surface of the water with a mist of cosmetic alcohol or hairspray. The nail poilsh will begin to bubble and split, and in a few more seconds it will look the way it does on my nails. Then you dip your fingers into the water, so that the pattern is transferred on to your nails. It is quite easy to do, although it's pretty messy.

את הלוק הזה הכנתי עם טכניקת "Water Spotting". יש הרבה טיוטוריאלים לזה, אבל אני אסביר בקצרה: לוקחים כוס מים (כדאי בחד-פעמי) ומניחים עליו כמה טיפות לק. אחרי כמה שניות הלק יתפזר על משטח המים. משפריצים קצת אלכוהול קוסמטי או ספריי לשיער עליו, ומייד הלק יתחיל לבעבע ולהתפרק בצורות שנראות כמו מה שיש בתמונות כאן, טובלים את הציפורניים בתוך הכוס, והלק נדבק לציפורניים. זה ממש קל לעשות, אבל עושה המון בלגן!

Sinful colors can be purchased at Superpharm branches all over Israel, and it usually costs between 10-15 shekel per bottle. They have a lot of beautiful colors, and they are very affordable, go check them out!

ניתן להשיג סונפון קולורס בסניפי סופרפארם ברחבי הארץ, בדרך כלל במחירים של 10-15 ש"ח לבקבוק. יש להם המון צבעים מהממים, תלכו לראות!
Related Posts Plugin for WordPress, Blogger...